Tuesday, May 17, 2011

Forced Perspective

for this photo i wanted it to look like paige was standing on sydney's hand

in this photo, i tried to make it look like sydney was climbing up a wall

Tuesday, May 10, 2011

Color Edits

For this photo, I changed the color of the pink so that it went better with the rest of the photo.

For this photo, I changed the color of the dandelions to make them pop out a little more and go better with the green.

Monday, May 9, 2011

Color Scheme

I emphasized the greens in this photo by adding a photo filter; this gives it a calming mood.

Friday, April 29, 2011

Gradient Map

This photo I changed the opacity and blending mode to bring out some redish color to make it warmer.

For this photo, I changed the opacity, which gives the photo kind of a vintage look.

For this photo, I changed the blending mode, so the colors are fairly similar to the original, but instead of blacks in the shadow, there is a purple-y color and the greens are more vibrant.

Thursday, April 28, 2011

Solarisation


With the solarisation, I played around with positive/negative and black & white. I like the black and white ones better than the color ones, but I am not a huge fan of the solarisation look.

Wednesday, April 20, 2011

Creative Color

For this photo I played around with curves, vibrance and saturation to create a high contrast in the photo.

For this photo, I used a warm photo filter and played around with saturation and curves to and added a vignette to create a vintage look to the photo.


For this photo, I used gaussian blur, a vignette, and adjusted colors to create a pictorialism look.

Wednesday, April 13, 2011

Text & Image

For this photo, I took a photo of feet covered in sand and enhanced it slightly with Photoshop and then used Illustrator to add the quote "life's a beach and i'm just playing in the sand". Something I think went well with this photo was the way the text curves around the feet and how the quote suits the photo. A challenge I had with this photo was that with the very bright color of the sand and then how dark the shadows were, it was difficult to find a good color for the text that was fairly readable over both the highlights and shadows.

Tuesday, April 5, 2011

Sharpness

before
after

For editing this photo, I used the high pass filter to make the photo sharper, then the overlay blending mode to make the colors visible again.

Thursday, March 17, 2011

Rhythm Assignment

For this photo, I combined six different pictures of my sister sledding down a hill into one. I just used the sports setting on the camera to get clear pictures while she was sledding. Then using photoshop, I used the picture of her closest to me as the background, then took the other pictures and used selection tools and layer masks to take just her body and the sled and drag it into the background picture to show her whole journey down the hill. Once I had the pictures in place and resized to look a little more realistic, I changed the opacity so her body became more opaque as she got farther down the hill and also enhanced the photo with basic editing techniques.
I really liked how this photo turned out with the different opacities and the different positions of her sledding down the hill. Using the selection tools and layer masks was a little challenging at first, but after a few times, it was quite easy.

For this photo, I stood in the same place while someone moved a tennis ball down the wall so that when I mashed all the original photos into one, it looks like the same ball is rolling down the wall. Again, I used the picture when the ball was closest to me as the background photo, then used selection tools and layer masks to select the tennis ball in the other photos and drag it into the background photo. Then I used resized the tennis balls, changed the opacity to add some interest/emphasis and then enhanced the photo with basic editing tools.
I was also really happy with how this photo turned out, especially the way the tennis balls look like they are rolling down the hill and also how the colors of the wall and balls stands out so much against the white snow. I was surprised at how simple this was to make once I got the hang of it.

Friday, March 11, 2011

Color Accent

I used selection tools to outline the frog and then changed that part to black and white, then edited the wall color behind the frog so that it would stand out more against the frog.

Again, I used selection tools to outline her bright pink sweater so that it would stand out against the rest of the photo which I made black and white.

Monday, March 7, 2011

Portraits

For this photo, the light source was to the left side, but not visible in the photo. I used more basic editing techniques such as curves, color balance, and dodging to enhance the photo a little bit. Then I added a lighting effect to make the side the sun was on brighter to emphasize where the light was coming from. Something I liked about this photo was how the lighting effect turned out and how it made the left side of the photo brighter and created a bigger contrast in the background. Something I think didn't go as well was that it was a little challenging to get Nash's face brighter without making the background too light.
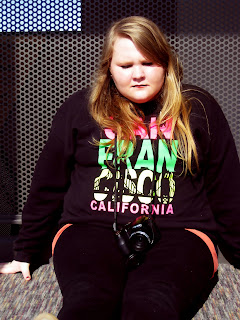
This photo was taken with the light source coming from the front. Again, I used editing techniques such as curves, color balance, etc. to enhance the photo. On this photo I also used spot healing and surface blur in order to smooth out the face, and then painted over some areas with the black brush to enhance areas such as the eyes, hair, and mouth. I really liked how the colors turned out in this photo and how the surface blur turned out. I was surprised at how bright the colors turned out, especially the colors of the sweatshirt, because I thought the sun shining directly on them would maybe wash the colors out a little.
The light in this photo was coming from kind of a 3/4 angle. In addition to using curves, color balance, etc. I put a photo filter on this photo. The color of the filter was a warm orange-ish color to compliment the warm color of the wood and with the photo filter, I preserved the luminosity. Something I like about this photo is the lines of the wall/floor and how it leads to the subject. Something that was a little surprising was how the photo filter didn't make the photo as orange as I thought it would.

Thursday, February 17, 2011

White Balance Assignment


For this photo, I used the Auto White Balance setting to take the original photo. To enhance this photo, I made adjustments using curves and color balance to make colors pop. One thing I think went well with this photo was the way the colors turned out after editing it. Another thing I like about this photo is how the candy heart and hand is in focus, but the rest of the photo is not. Something I didn't like as much was the vignette becuase I think I like the photo more without it and it was a little bit of a challenge to do the vignette right.
For this photo, I also used the Auto White Balance setting for the original photo and then enhanced it using curves, contrast, and color balance. Something I think went well with this photo was how vibrant the colors of the pens are. Something challenging about this photo was getting the colors to be bright, but not too bright and unrealistic.

Friday, February 4, 2011

A Day In The Life

For this photo I used an ISO of 100 for the original photo. Using Photoshop, I made the picture brighter and made the colors a little more vibrant. One thing that went well with this is that it isn't very grainy. Something that didn't go as well was that the lighting in the room made the the photo kind of dark, which made editing a little more challenging. Something I would do differently is think more about not just the subject itself, but where my subject is so that the pictures turn out a little better. Something that surprised me is that even though editing this photo was a little more challenging than others, the colors came out really well for how dark/bland the original picture was.

Monday, January 31, 2011

Artist Statement

I create art mostly because it's something I enjoy doing. To me, art means expressing yourself, which is another reason why I create art. Things that inspire are usually quite random. I don't really have anything that I feel really strongly about and inspires me; I can feel inspired by anything from nature to friends/family to random everyday objects. Outside of doing Photo 1 and 2 in school, the work I've done is so far is taking pictures for fun, primarily to remember the good times from a concert, vacation, or special event. I'm not quite sure what kind of work I want to do this semester, but I would like to make things that were inspired by something.

For my artist analysis, I chose Ralph Clevenger. His photos are about nature, animals, humans, etc. I would say he is a digital photographer and probably uses some sort of photoshop techniques on his photos to make them look even better. Overall, I really like his photos because although a lot of the subjects are quite simple, the colors and camera angles make them look better/more interesting.